

Different Containers for the Same Practice
Once you understand the foundations of distance Reiki, the next question is usually very practical:
How do I actually do it?
There is no single universal method used by every Reiki lineage.
Some practitioners work with a photograph.
Some write the recipient’s name on paper.
Some use a pillow, teddy bear, or another object as a surrogate.
Some visualize the recipient between their hands.
Some simply establish the Reiki connection through Hon Sha Ze Sho Nen and intention.
These methods may look different on the surface, but they share the same foundation.
You:
- obtain consent;
- prepare yourself;
- establish a clear intention;
- invoke the Level 2 symbols;
- become receptive;
- offer Reiki;
- release attachment to the outcome;
- and close the practice consciously.
The method is not the source of Reiki.
It is the container that helps you enter the practice.
Choosing a Distance Reiki Method
You do not need to master every method immediately.
Begin with one that feels simple.
Practice it several times.
Notice how easily you can remain focused and receptive.
Then explore another method.
Over time, you may develop a preference.
You may find that one approach works beautifully for personal friends while another feels more natural when practicing with a client.
You may use photographs when available.
You may prefer writing a name.
You may eventually need almost no external support at all.
There is no need to decide that one method is spiritually superior.
The best method is often the one that helps you:
settle, connect, remain present, and release control.
Method 1 — Working With a Photograph
A photograph is one of the simplest and most commonly used tools in distance Reiki.
It gives the mind a clear visual reference.
You know exactly who the practice is for.
This can be particularly helpful when you are first learning.
Choose a photograph in which the recipient is clearly identifiable.
A recent image can feel easier, although there is no need to become rigid about this.
The photograph itself is not believed to contain the person.
It simply helps you orient your attention.
How to Practice With a Photograph
Place the photograph in front of you or hold it gently between your hands.
Begin with Gassho.
Settle your breathing.
State your intention clearly.
For example:
I offer Reiki to [name] with their consent, for their highest good and according to what is most appropriate for them.
Then invoke your Level 2 symbols.
Within the sequence taught in this manual:
Cho Ku Rei
→ Sei He Ki
→ Cho Ku Rei
→ Hon Sha Ze Sho Nen
→ Cho Ku Rei
Silently repeat each symbol’s name three times while drawing it.
You may draw the symbols over the photograph, above it in the air, or visualize them over the recipient.
Then place your hands gently around or above the photograph.
Allow Reiki.
There is no need to concentrate intensely on the image.
The photograph has already served its purpose.
Let your attention soften.
What to Do With Your Hands
When using a photograph, you may:
- hold it between your palms;
- place one hand above and one below;
- rest your hands over it without touching;
- place both hands beside it;
- or simply keep the photograph nearby while holding your hands in a comfortable Reiki position.
There is no need for complicated geometry.
Your hands do not need to perfectly “surround” the recipient energetically.
Choose a position that lets you remain relaxed.
If your shoulders become tense or your wrists hurt, change position.
Distance Reiki should not require physical strain.
Using Full-Body Hand Positions With a Photograph
Some practitioners like to imagine that different areas of a photograph correspond to different areas of the recipient’s body.
They may offer Reiki toward:
- the head;
- shoulders;
- heart or upper torso;
- abdomen;
- hips;
- legs;
- feet.
You may move your hands over the photograph in a sequence similar to an in-person session.
This can provide useful structure.
But remember that the photograph is a focusing tool.
You do not need anatomical precision.
And if you feel drawn to one region, do not interpret that as diagnosis.
You may simply stay there longer.
Then continue.
Method 2 — The Written Name Method
You do not need a photograph to practice distance Reiki.
A written name can be enough.
This method is simple, discreet, and especially useful when no image is available.
Write the recipient’s name on a small piece of paper.
You may also include:
- their city or country;
- the date of the session;
- or a brief agreed intention.
For example:
Jordan Lee
Distance Reiki
September 7, 2026
Or:
Jordan Lee
Reiki for support and well-being
Keep the wording simple.
Avoid writing a demanded outcome such as:
Make the pain disappear.
Instead, allow the Reiki intention to remain open.
How to Practice With a Written Name
Place the paper between or beneath your hands.
Begin with Gassho.
Establish the intention.
Invoke the Level 2 symbols.
Then offer Reiki.
You may imagine the written name as a point of connection.
You do not need to visualize the recipient clearly.
The name simply tells your practice:
This is who the Reiki is being offered to.
For some practitioners, this method feels surprisingly natural.
It removes the need to maintain a visual image and allows the mind to become quieter.
Method 3 — The Surrogate Method
A surrogate is an object used to represent the recipient during a distance Reiki session.
Common choices include:
- a pillow;
- a teddy bear;
- a folded blanket;
- a cushion;
- or another simple object.
The object does not become the recipient.
It is a physical representation that allows you to use familiar hand positions.
This can make the transition from Level 1 to Level 2 feel especially comfortable.
How to Use a Surrogate
Choose a clean, simple object.
Decide which part represents the recipient’s head and which represents the feet.
Begin with Gassho.
Establish the intention clearly.
Invoke the Level 2 symbols.
Then offer Reiki to the surrogate as if you were moving through familiar hand positions.
For example:
- head;
- shoulders;
- upper torso;
- abdomen;
- hips;
- legs;
- feet.
You may use hands-on or hands-above positions.
Because the surrogate provides a physical structure, this method is often helpful for students who find purely mental visualization difficult.
The Surrogate Is a Map, Not the Person
It is important to keep the role of the surrogate clear.
You are not claiming that the object literally becomes the recipient.
It functions as a map or symbolic focus.
This can be very useful.
Human attention often works well with physical reference points.
A surrogate gives your hands somewhere to rest and your mind somewhere to organize the session.
The Reiki practice is still the essential part.
The object simply supports it.
Method 4 — The Hands-as-Surrogate Method
You can also use your own hands as a simple representation of the recipient.
This requires no photograph, paper, or object.
For example, you might imagine:
- the fingers representing the head;
- the palm representing the torso;
- the wrist representing the lower body.
Some lineages teach specific hand mappings.
Others use the method more freely.
You may cradle one hand within the other and offer Reiki through the symbolic representation.
This is especially convenient when traveling or when you want a very simple distance practice.
How to Practice With Your Hands
Begin in Gassho.
Establish your intention.
Invoke the Level 2 symbols.
Then choose one hand to represent the recipient.
Place the other hand over or around it.
Offer Reiki.
You may remain in one position for the entire session.
Or you may move your working hand across the symbolic areas of the receiving hand.
Again, precision is not the goal.
The hand is simply helping your attention remain connected to the practice.
Method 5 — Visualization
Some practitioners prefer to visualize the recipient directly.
You might imagine them:
- sitting in front of you;
- resting comfortably;
- surrounded by Reiki;
- held gently within your awareness;
- or simply present between your hands.
Begin with Gassho.
Set the intention.
Invoke the Level 2 symbols.
Then allow the recipient to come into awareness.
You do not need a vivid mental image.
You may simply have a sense of them.
Their name may arise.
Their face may appear.
Or you may know who the session is for without seeing anything internally.
All are acceptable.
Do Not Force Visualization
Visualization is useful only if it helps.
If you spend half the session struggling to mentally construct the recipient’s face, you are no longer relaxing into Reiki.
Let the image be soft.
Incomplete is fine.
You may even lose the image entirely.
The connection does not need to depend on photographic mental accuracy.
Return to the intention.
Return to the symbols.
Return to Reiki.
Method 6 — Reiki Between the Hands
Another simple method is to hold your hands facing one another, as though gently holding a sphere.
You may imagine the recipient or the Reiki session within the space between your palms.
Begin with Gassho.
Invoke the symbols.
Then separate your hands slowly.
Allow a comfortable space between them.
You may imagine the recipient resting within this space.
Or you may simply know that the space represents the distance Reiki connection.
Remain relaxed.
Notice warmth, tingling, pressure, or other sensations if they arise.
But do not search for them.
Allow Reiki to unfold.
This can be a very meditative form of distance practice.
Method 7 — Direct Intention
As your Reiki practice develops, you may find that you do not always need a photograph, surrogate, written name, or visualization.
You may enter Gassho.
Think clearly of the recipient.
Invoke the symbols.
Establish Hon Sha Ze Sho Nen.
And simply begin.
This is sometimes one of the most elegant forms of distance Reiki.
There are fewer external supports.
The practice rests more directly on:
intention, symbol, receptivity, and Reiki.
However, there is no prize for reaching this stage quickly.
External tools are not signs of weakness.
They can remain meaningful parts of a mature practice.
Some practitioners continue using photographs or written names for decades because they enjoy the clarity and ritual.
Others gradually simplify.
Let your relationship evolve naturally.
Using the Full Symbol Sequence
Whatever distance method you choose, you may use the layered sequence taught in this manual. As you gain experience and confidence in your practice, you may naturally develop your own preferred method or symbol sequence.
Cho Ku Rei
→ Sei He Ki
→ Cho Ku Rei
→ Hon Sha Ze Sho Nen
→ Cho Ku Rei
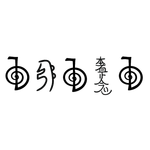
As always, silently repeat each symbol’s name three times while drawing it.
This sequence may be drawn:
- over a photograph;
- over a written name;
- over a surrogate;
- on your palm;
- between your hands;
- mentally over the recipient;
- or simply within your awareness.
You may trace the symbols with your hand. Alternatively, you may visualize each symbol and beam it toward the desired recipient or location if this feels more natural to you. Both methods may be used to establish the energetic connection and invoke the symbols.
After the final Cho Ku Rei, pause.
Do not immediately rush to the next step.
Allow the invocation to settle.
Then offer Reiki.
Why Use Cho Ku Rei Throughout the Sequence?
Within the approach taught here, Cho Ku Rei is used repeatedly because of its traditional association with focusing and strengthening Reiki.
It opens the sequence.
It supports the symbols that follow.
It returns the practice to focused Reiki presence.
And it completes the layered invocation.
Other Reiki lineages may teach a different sequence.
That is not necessarily a contradiction.
Reiki has been transmitted through different teachers, cultures, and schools.
Learn the structure of your lineage.
Practice it sincerely.
Then allow experience to deepen your understanding.
Do You Need to Use All Three Symbols Every Time?
Different traditions answer this differently.
Within the structured distance practice taught here, the full sequence provides a clear and reliable foundation.
It is especially useful while you are learning.
As your practice matures, however, your relationship with the symbols may become more fluid.
You may feel drawn toward a particular sequence.
You may invoke the symbols more intuitively.
You may find that simply bringing Hon Sha Ze Sho Nen into awareness creates the distance connection within an already established Reiki practice.
Or you may continue to prefer the full sequence every time.
There is no need to force your practice toward greater minimalism.
Nor is there any need to make it increasingly elaborate.
Let confidence create freedom, not rigidity.
Offering Reiki to the Whole Person
When practicing at a distance, you may wonder:
Where should I send the Reiki?
A simple answer is:
to the whole person.
You do not need to identify what is wrong.
You do not need to scan for problems.
You do not need to determine where Reiki “should” go.
You can establish:
I offer Reiki to this person according to what is most appropriate for them, for their highest good.
Then remain receptive.
If your attention naturally rests on one area, you may allow that.
But do not turn it into a diagnosis.
Reiki does not require you to know what the recipient needs better than they do.
A Structured Distance Hand-Position Sequence
If you prefer structure, you may follow a sequence similar to an in-person Reiki session.
Using a photograph, surrogate, visualization, or your hands, you might move through:
1. Head
Offer Reiki to the overall head region.
2. Shoulders and Neck
Remain gently focused without interpreting sensations.
3. Upper Torso
Offer Reiki broadly through the chest and upper body.
4. Abdomen
Allow Reiki without attaching meaning to the area.
5. Hips and Pelvis
Remain respectful and general.
6. Legs
Offer Reiki through the lower body.
7. Feet
Allow the session to settle and ground.
You might spend several minutes at each position.
Or move according to intuition.
The sequence is structure, not law.
A Short Distance Reiki Method
Not every session needs to be long.
A short practice may be:
1. Gassho
Settle.
2. Consent and Intention
Know who the practice is for.
3. Symbols
Invoke the full sequence.
4. Hold the Recipient in Awareness
Using whatever method you prefer.
5. Offer Reiki
Remain for five to ten minutes.
6. Close
Return to Gassho and release the connection.
A short, sincere practice can still be meaningful.
Do not assume longer automatically means better.
A Longer Distance Reiki Session
If you want a more structured session, you might practice for twenty to forty-five minutes.
For example:
Arrival and Gassho — 2–5 minutes
Symbol invocation — 2–3 minutes
Head and upper body — 5–10 minutes
Torso and abdomen — 5–10 minutes
Lower body — 5–10 minutes
Whole-person Reiki — 5–10 minutes
(Whole-person Reiki: Shift your attention away from individual body areas and offer Reiki to the recipient as a unified whole. Visualize them surrounded by Reiki from head to toe, or gently sweep your hands above the surrogate from head to foot. Allow the energy to settle and integrate throughout their complete energy field.)
Closing — 2–5 minutes
These times are only suggestions.
You do not need to watch the clock constantly.
Use enough structure to feel supported without turning the session into a mechanical schedule.
Distance Reiki for Emotional Support
When the recipient has asked for Reiki during an emotionally difficult time, you may incorporate Sei He Ki intentionally.
For example:
- begin with Cho Ku Rei;
- invoke Sei He Ki;
- return to Cho Ku Rei;
- invoke Hon Sha Ze Sho Nen;
- close the sequence with Cho Ku Rei.
Then offer Reiki.
You do not need to mentally enter the person’s emotional story.
You do not need to interpret their feelings.
You do not need to “clear” their sadness or remove their anger.
Hold the intention gently:
May Reiki support what is needed in this person’s emotional experience, for their highest good.
Then release it.
Reiki for a Situation
Distance Reiki can also be offered toward a situation when this fits your lineage and ethical practice.
You might use:
- a written description;
- a date;
- an event name;
- or a simple intention.
For example:
Presentation — September 12
or:
Upcoming family conversation
Then practice in the same way.
Avoid using Reiki to force another person’s behaviour.
Instead of:
Make them agree with me.
use something like:
May Reiki support clarity, compassion, and the most appropriate unfolding of this situation.
That keeps the practice aligned with Reiki rather than control.
Reiki for the Past
For a personal past experience, you may write a brief reference to the time or event.
For example:
My first year at university
or:
My younger self at age twelve
Begin the practice.
Invoke the symbols.
Use Hon Sha Ze Sho Nen.
Then offer Reiki.
There is no need to replay the experience.
You are not attempting to change physical history.
You are offering Reiki within your present relationship with that memory or period of life.
Keep the practice gentle.
Reiki for the Future
For a future situation, you might write:
Job interview — September 18
or:
Upcoming journey
or simply bring the event into awareness.
Then invoke the symbols and offer Reiki.
Again, release control.
You are not programming reality.
You are not guaranteeing success.
You are creating a Reiki practice around the future situation.
Then return to ordinary life and do what is practically required.
Prepare.
Plan.
Practice.
Act.
Reiki accompanies participation.
Using a Reiki Box
Some Reiki practitioners create a Reiki box for ongoing intentions.
This can be a small box containing folded pieces of paper with:
- names;
- personal intentions;
- situations;
- future events;
- or people who have consented to receive Reiki.
The box provides a physical container for distance practice.
You may place your hands around or above it.
Invoke the Level 2 symbols.
Then offer Reiki to the intentions contained within.
This can be a beautiful ritual when used with discernment.
Keep the Reiki Box Current
If you use a Reiki box, review it regularly.
Do not allow it to become a permanent energetic filing cabinet.
Remove completed intentions.
Remove people who no longer wish to receive Reiki.
Update situations that have changed.
Respect consent.
You might review the box weekly or monthly.
This keeps the practice conscious.
A Reiki box should support presence.
Not automatic spiritual habit.
Group Distance Reiki
As your practice develops, you may sometimes offer Reiki to a consenting group.
This could include:
- a Reiki circle;
- family members;
- participants in a shared meditation;
- or people who have intentionally joined a Reiki practice.
You may write the group name.
Use a photograph if appropriate.
Or establish the group simply through intention.
Invoke the symbols and offer Reiki to the group as a whole.
You do not need to mentally divide your attention among every individual.
Reiki practice does not require you to become an energetic multitasker.
Establish the group clearly.
Then allow Reiki.
Do Not Measure Your Ability by Sensation
Some distance Reiki methods may feel more energetic than others.
Perhaps you feel intense warmth when using a photograph.
Perhaps your hands tingle strongly with the surrogate method.
Perhaps direct intention feels almost silent.
Do not conclude too quickly that one method “works” and another does not.
Your own sensory experience is only one part of the practice.
Strong sensation does not automatically mean stronger Reiki.
Quiet does not mean absence.
Notice.
Practice.
Compare over time.
But do not turn sensation into a scoreboard.
When You Feel Drawn to a Particular Area
During distance practice, you may feel your attention pulled toward one part of the recipient’s symbolic representation.
Perhaps your hands keep returning to the shoulders.
Perhaps you sense warmth when focusing near the abdomen.
Perhaps an image of the head appears repeatedly.
You may choose to remain with that area for a little longer.
This is similar to the receptive principles explored through Reiji Ho and Byosen Reikan Ho.
But keep the same discipline:
notice without diagnosing.
You can record:
My attention repeatedly returned to the shoulder area.
You should not conclude:
Reiki showed me that there is a medical problem in the shoulders.
Receptivity and humility belong together.
When Your Mind Wanders
Distance Reiki can sometimes be more mentally challenging than in-person Reiki.
The physical recipient is absent.
Your attention may wander.
You may begin thinking about dinner.
Work.
Tomorrow.
Whether the recipient is feeling anything.
Whether you are doing the symbols correctly.
Notice.
Return.
You might return to:
- Gassho;
- the recipient’s name;
- the photograph;
- your hands;
- your breathing;
- or Cho Ku Rei.
There is no need to criticize yourself.
Returning is part of the practice.
When You Begin Trying Too Hard
Another common challenge is effort.
Because distance Reiki feels mysterious, beginners may subconsciously try to compensate by concentrating very hard.
The forehead tightens.
The shoulders rise.
The practitioner imagines pushing Reiki toward the recipient.
If you notice this, soften.
Relax your jaw.
Drop your shoulders.
Breathe naturally.
Remember:
Reiki does not travel farther because you strain harder.
The distance practice is not a test of mental force.
Become the conduit.
Let Reiki be larger than your effort.
Closing Any Distance Reiki Method
Whatever method you use, close clearly.
When the practice feels complete:
bring your hands into Gassho.
Pause.
Acknowledge the recipient.
Acknowledge Reiki.
Release the intention.
You may use Cho Ku Rei as part of your closing practice if that is how you have been taught.
Then consciously recognize:
This session is complete.
If using a photograph or written name, set it down.
If using a surrogate, release its symbolic role.
If using visualization, allow the image to dissolve.
If using your hands, gently shake them or rest them.
Return fully to the room.
You Do Not Need to Stay Connected
After a distance Reiki session, you do not need to keep checking the recipient energetically.
You do not need to wonder constantly whether Reiki is still flowing.
You do not need to remain mentally attached.
The session has ended.
Release it.
This is part of healthy holding space.
Care does not require constant energetic involvement.
The ability to close is just as important as the ability to open.
After the Session
If appropriate, you may check in with the recipient afterward.
Keep the question open.
For example:
How was the session for you?
or:
Did you notice anything during or after the Reiki practice?
Avoid leading questions.
Instead of:
Did you feel heat in your left shoulder?
allow them to describe their own experience first.
If you later choose to share something you noticed, frame it as your experience.
For example:
At one point, my attention kept returning to the shoulder area.
Not:
Reiki told me something is wrong with your shoulder.
Language matters.
Your First Three Practice Sessions
As you learn, it can be helpful to practice three simple sessions using different methods.
Session One — Photograph
Practice with a consenting recipient’s photograph.
Use the full symbol sequence.
Offer Reiki for ten to twenty minutes.
Session Two — Written Name
Use only the recipient’s written name.
Notice whether the practice feels different without an image.
Session Three — Surrogate or Hands
Use a physical surrogate or your own hands.
Move through familiar hand positions.
After all three sessions, reflect:
- Which method helped me settle most easily?
- Which method felt distracting?
- Which felt most natural?
- Did I depend heavily on visualization?
- What sensations did I notice?
- Did I become attached to receiving feedback?
- Was I able to release the outcome?
- Which method would I like to practice again?
There is no correct answer.
The purpose is familiarity.
Developing Your Own Distance Reiki Practice
With experience, you may combine methods.
Perhaps you begin with a photograph and later close your eyes and visualize the recipient.
Perhaps you write the person’s name and hold the paper between your palms.
Perhaps you use a surrogate for most of the session and then finish with the recipient held between your hands.
Perhaps eventually you simply enter Gassho, invoke the symbols, establish the connection, and offer Reiki.
Your practice may become simpler.
Or more ritualized.
More visual.
More intuitive.
More structured.
Let your practice mature through experience rather than through pressure to imitate someone else’s style.
Technique Is the Doorway
Distance Reiki methods can be fascinating.
But do not become so interested in technique that you lose Reiki itself.
The photograph is a tool.
The surrogate is a tool.
Visualization is a tool.
The written name is a tool.
The symbols are tools.
Even hand positions are tools.
They give structure to attention.
They help you enter practice.
But eventually, beneath every method, you return to the same place:
presence.
receptivity.
consent.
humility.
Reiki.
The technique opens the doorway.
Then you stop staring at the doorway and enter.
Reflection
Before continuing, consider:
- Which distance Reiki method feels most natural to me?
- Do I prefer a physical reference such as a photograph or surrogate?
- How comfortable am I practicing without visualization?
- Can I use structure without becoming rigid?
- Can I follow intuition without turning it into certainty?
- What happens when I use the full symbol sequence in distance practice?
- Am I trying to push Reiki across the distance?
- Can I relax into being a conduit?
- Do I equate stronger sensations with stronger Reiki?
- How will I respond when nothing dramatic happens?
- Can I close the session clearly and release the recipient afterward?
- How might my preferred method change with experience?
- Do my methods support Reiki, or am I becoming preoccupied with technique?
Allow practice to answer these questions over time.
Looking Ahead
You now have several practical ways to offer distance Reiki:
a photograph,
a written name,
a surrogate,
your own hands,
visualization,
the space between your palms,
and
direct intention.
You have also explored how the Level 2 symbols can be incorporated into each method and how to keep the practice grounded in consent, receptivity, and release of outcome.
The next step is to bring these pieces together into a complete session.
In the next chapter, Structuring a Distance Reiki Session, we will walk through the entire process from beginning to end:
pre-session communication,
consent,
preparation,
opening,
symbol invocation,
the Reiki session itself,
closing,
post-session communication,
documentation,
and practitioner boundaries.
A good structure does not make Reiki rigid.
It creates enough clarity that you can stop worrying about what comes next.
And when the structure becomes familiar, you are free to listen.
Structure holds the practice.
Presence gives it life.